How To Make Your Own Off Grid Solar Grill

Living off grid is one way to increase self-sufficiency and reduce costs. It can help protect the environment and offers some definite benefits to those who participate.
One of the ways to cook without electricity is to harness the power of the sun in a solar grill. While these can be purchased from many online and offline locations, such as an off-grid cooking warehouse, it is also possible to make one at home. They can be made from items one already has in the garage or attic, or separate items may be purchased to create a more permanent version.A solar oven can be used to cook food, though it will not be as fast to cook as a grill.
Solar Grill
To create a solar grill, it may be necessary to be able to weld, though it is possible that it can be made with other forms of attaching the pieces together.
Create a holder that has a flat surface to hold a cooking pan, and a support to hold a large magnifying glass. A very large rectangular glass will provide a larger cooking surface, but smaller glasses can still allow for cooking, though the area will be smaller. Make the glass adjustable to focus the sunlight on the pan regardless of the sun’s angle in the sky. This works similarly to burning tiny things with a small glass (some people have done woodburning with this), though at a larger level. It still may take longer than cooking over a propane flame or hot charcoal, but it does not require additional fuel.
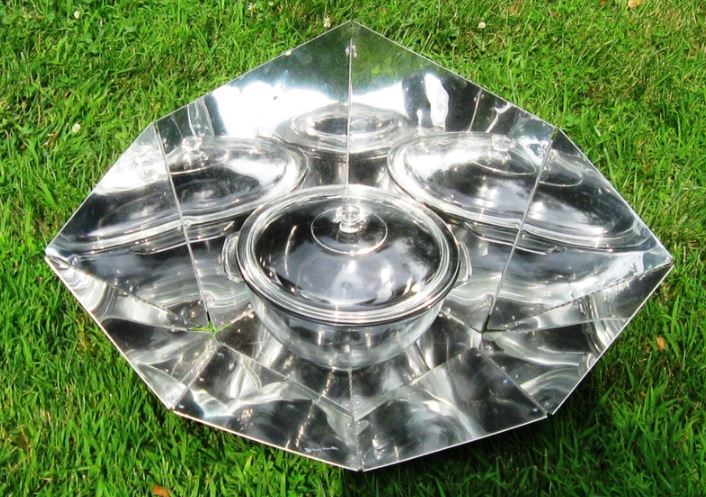
Disposable Solar Oven
While not exactly a grill, solar ovens can be used to cook food. They work more slowly than an average oven – closer to the cooking time and temperature of a slow cooker. Creating one is quite simple, but does take several steps.
Start with two cardboard boxes. One should be about two inches smaller than the other – more space is better than less. Place the smaller one inside the larger one, centered, and glue it or otherwise affix it in place. Fill the space between the boxes with insulation such as torn paper or fabric bits (the paper that went through a shredder is perfect for this). Fill it completely for best results. Line the interior of the inner box with black paper or fabric; this helps to hold in the heat.
To capture the sun’s heat, make four reflectors by making flaps. One side should be the same width as the outer box, and the opposite side should be about two inches longer, making a trapezoid. Cover one side with aluminum foil (as smoothly as possible) and tape or glue to keep it in place. Attach the side that matches the box to the box. Repeat until all four sides have a reflector.
Find a good place in the sun for the solar oven. Place food inside a pot or casserole dish inside, then tilt the reflectors to a 45-degree angle (as compared to upright). Use sticks, rods, or wire to keep them in place. This will reflect the sun into the box, heating up the interior. Generally, these ovens reach 250-350 Fahrenheit. If meat is included in the dish being cooked, check it with a meat thermometer to make sure its inner temperature has reached the proper level before consuming.
Permanent Solar Oven
This is quite a bit more complicated but will last much longer. It is also possible to cook more food at a time in this oven.
Start with a metal drum. Using a metal saw, cut it in half, from top to bottom, making two cradle-like halves. This oven only uses one, so the other can be reserved, discarded, or made into a second one to use later or sell.
Thoroughly clean the inside of the drum half. If it has held oil, use a good degreaser. Be sure to remove all grease and oil, even from the crevices, edges, and corners. A brush may be necessary to ensure all areas are clean and oil-free.
Wearing safety glasses and gloves, line the inside of the drum with a metal sheet, after cutting to fit. Drill holes through both layers and use rivets to install the metal inside the half-drum. Line the ends, as well, with half-circles of sheet metal. The easiest way to measure this is to measure the radius and use a piece of string to make a circle on the sheet metal; cut it out and then in half.
Using barbecue spray paint, which is made to withstand high temperatures, spray a reflective coating on the interior of the oven-in-progress. Be sure the area is well-ventilated.
Create a sliding lid from glass – tempered glass cut to fit the top of the oven is best, and this can be done at many hardware stores or glass providers. For a track to hold the glass, use flashing. Two layers of flashing – one just inside and one just outside the top edge – set with just enough space between to hold the glass is the best way to do this. Use rivets to attach these, as well. Some sort of handle to use to slide the glass may be desired.
Apply a thin layer of spray-on insulation to the outside of the drum. This will help to keep the interior hot once the sun warms it.
When the insulation is dry, set the half-drum curved side down into a frame. This will prevent the oven from tipping. Use screws to attach it. If you live in the Northern hemisphere, angle it slightly so you can aim it toward the south for better sunshine access.
Use a drill to make holes for drainage in the bottom of the oven, to release condensation. These should be about three inches apart, across the bottom, all the way through to the ground.
If you would like to know what the temperature is inside the oven at any given time, place a magnetic-backed thermometer – meant for wood stoves – on the inside where you can see it through the glass top. While this will tell you the temperature inside the oven, it does not reflect the temperature of the food, so remember to use a meat thermometer if cooking meat.
An aluminum rack in the bottom of the oven will allow pots, casseroles, or pans of food to be placed in a stable manner. Line up the rack to be level; there is no need to permanently attach it.
This oven will also work like a slow cooker.