Using an Axe to Prepare Construction Materials for Off-Grid Building
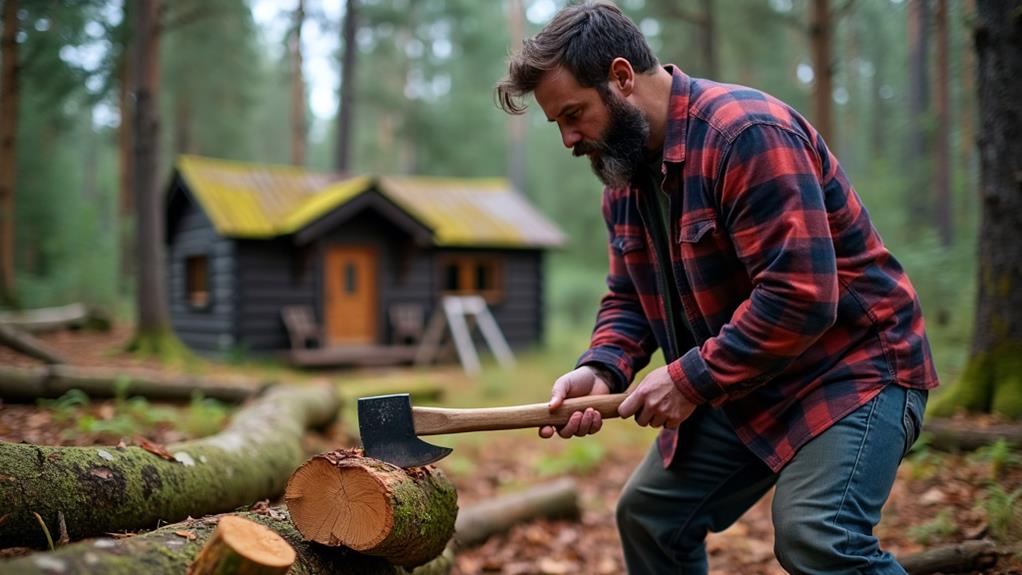
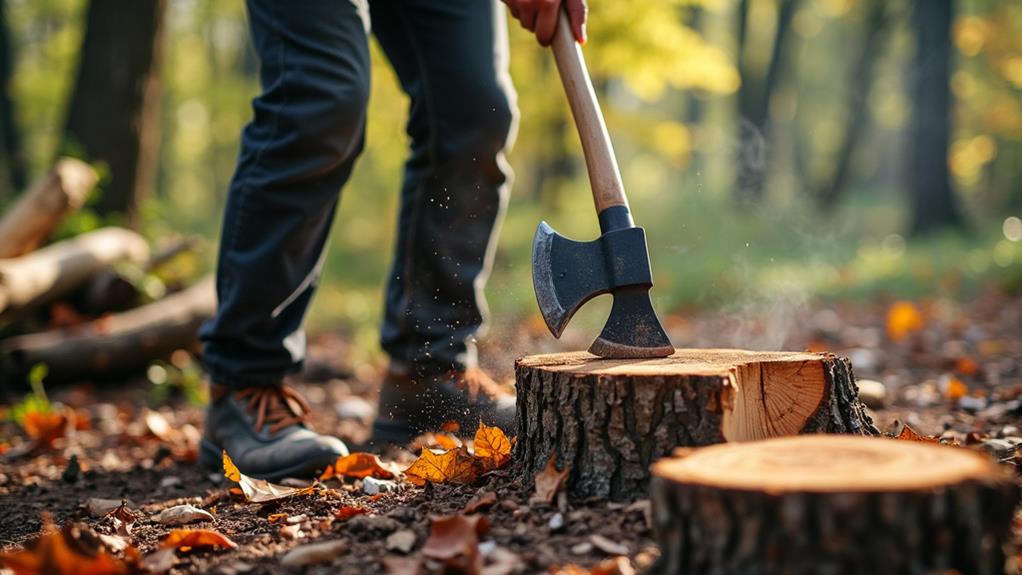
When preparing construction materials for an off-grid building, using an axe like the Gransfors Bruk model 1900 is essential. This tool is not only for chopping wood but also crucial for peeling and scribing logs to ensure they fit together seamlessly.
Mastering techniques such as using log dogs for stability and precision can significantly improve your building's structural integrity and visual appeal. Selecting the right trees and mastering these techniques are vital steps to ensure your project's success.
Let's explore the essential steps and tools involved.
Log Preparation
When preparing logs for your off-grid building, the first step is to peel each log to remove the bark and create a smooth surface. This initial process is crucial for both preparing the wood for scribing and identifying any potential flaws that might affect joint integrity. Thinner logs might take approximately 30 minutes to peel, so patience is essential.
After peeling, the next step is scribing, which involves marking important features like the "belly groove" and notch lines. These markings ensure each log fits perfectly with the next. During cutting, log dogs are used to prevent the logs from rotating, ensuring stability and accuracy.
For cutting along the scribed lines, a Gransfors Bruk model 1900 Swedish ax is recommended. This tool is essential for making precise, clean cuts that are critical for joint integrity. Once the cuts are made, ensure there's a minimum gap width of 8 cm between logs. This gap is necessary for fitting the logs properly and preparing them for the moss that will seal the gaps, ensuring a sturdy and well-insulated structure.
Essential Tools
When building off-grid, selecting the right tools is crucial for success. Start with a Swedish axe, such as the Gransfors Bruk model 1900, for efficient log preparation. Use an adze axe for creating precise notches, and don't forget a scribing tool to ensure accurate log fitting and maintain structural integrity.
Axe Types Overview
Understanding the different types of axes is crucial for any off-grid building project, as each tool serves a specific purpose in the construction process. One essential tool is the Swedish axe, particularly the Gransfors Bruk model 1900. It's renowned for its efficiency in log processing, making it invaluable for preparing construction materials. An adze axe is another key tool; designed to create slightly concave notches, it ensures logs fit properly during construction.
Axe maintenance and safety should be top priorities. Regular sharpening and proper storage are essential for maintaining your tools' effectiveness and longevity. A well-maintained axe not only performs better but also minimizes the risk of accidents. Always handle your axes with care and use protective gear to avoid injuries.
During construction, precise cuts between marked lines are necessary to effectively separate wood fibers while preserving the integrity of the logs. Using log dogs can prevent rotation during cuts, allowing for precise and controlled shaping. The right axe and proper technique will significantly enhance your off-grid building project.
Scribing Tool Essentials
Mastering the use of a scribing tool is crucial for ensuring your off-grid building project proceeds smoothly. A scribing tool is essential for accurately marking the belly groove and notch lines on logs, ensuring a proper fit during construction.
Effective scribing techniques begin with calibrating the scriber's width to accommodate the largest gap plus an extra centimeter for adjustments. This means your minimum gap should be no less than 8 cm, with 8.5 cm being the preferred smallest gap.
To ensure precision, align the scriber to a level line before you start marking. This alignment keeps your scribing consistent, ensuring the logs fit together seamlessly. When creating notches, adjustments to the scriber settings might be necessary to achieve the perfect fit.
Tool maintenance is equally important. Keeping your scriber in top condition involves regular cleaning and checking for wear and tear. A well-maintained scribing tool will provide accurate markings, which are vital for the structural integrity of your build.
Tree Selection

How do you ensure you have the best materials for your off-grid building projects? Start with the right trees. Initially, assess the availability of large trees on your property. If options are limited, you'll need to be strategic in your selections. Tree health is crucial; a healthy tree guarantees strong and durable wood. Check for signs of disease or damage to avoid wasting time and effort on unsuitable trees.
Next, consider species diversity. Different types of trees offer varying wood qualities that can be beneficial for different construction needs. For instance, some trees provide hard, resilient wood, while others might be easier to work with for specific parts of your structure. By planting a variety of species, you'll ensure a range of materials for evolving projects.
To optimize future building efforts, experiment with fast-growing species. Start by purchasing 15 roots to initiate growth trials. Monitor their progress and health closely; the initial log you harvest will indicate if you're on the right track. If successful, expand your planting next year. This proactive approach ensures a reliable, diverse supply of construction materials.
Scribing Techniques
When scribing, calibrate your scriber to accommodate the largest gap, adding an extra centimeter for fine-tuning. Accurately marking the belly groove and notch lines is essential for a tight fit between logs. Always align your scriber with a level line to maintain precision.
Scriber Width Calibration
To ensure a proper fit during log wall construction, you need to set the scriber width to accommodate the largest gap plus an additional centimeter. For instance, if your largest gap is 7 cm, adjust your scriber to 8 cm for precision.
However, for stability, a minimum gap width of 8 cm is recommended, with an ideal target around 8.5 cm. This extra centimeter guarantees the logs will fit snugly, reducing any potential for shifting or instability over time.
Accurate scriber adjustments are crucial. Start by aligning the scriber to a level line to maintain measurement accuracy. This alignment ensures that each log follows the contour of the one below it, creating a tight and secure fit.
An improperly calibrated scriber could result in gaps that are either too narrow or too wide, compromising the integrity of your log structure. Additionally, these scriber settings are essential for creating precise notch lines. These lines are critical for the integrity of the log joints, ensuring that each log interlocks perfectly with the next.
By paying attention to these details, you'll ensure a robust and well-fitted log wall. Following these guidelines will help guarantee the semantic accuracy, completeness, consistency, conciseness, relevance, interoperability, and trustworthiness of your log wall construction process.
Marking Belly Groove
Marking the belly groove is essential to ensure your log walls fit together seamlessly. To achieve this, focus on scribing accuracy. Start by calibrating your scriber to accommodate the largest gap, adding an extra centimeter for optimal fitting. A minimum gap width of 8 cm is recommended, ensuring a snug fit and effective alignment of the logs.
Once your scriber is set, align it to a level line to maintain consistency across all logs. This alignment ensures uniform depth and curvature for each groove. Carefully mark the belly groove on each log, taking your time to ensure precision. These marked lines will guide you during cutting, so thoroughness here will save you time and trouble later.
After marking, check the joint integrity by placing logs together to confirm they fit well. This step is crucial before applying any sealing materials like moss. Ensuring tight and well-aligned joints will provide long-lasting connections, making your log structure robust and durable.
Notch Line Precision
After marking the belly groove, precise notch line creation is your next critical task. To ensure accuracy, adjust your scriber width to accommodate the largest gap plus an additional 1 cm. This extra space is essential for accurate fitting techniques, ensuring that your logs fit snugly.
Align the scriber to a level line to maintain consistency and accuracy in your notch placement. Aim for a minimum gap width of 8 cm, though 8.5 cm is ideal to assure the stability and integrity of the log joints.
The scribing process involves marking both the belly groove and the notch lines. These markings guide you in creating concave notches that fit together seamlessly. Pay close attention to the notch geometry to guarantee the logs fit tightly and securely.
Carefully adjust your scriber settings to ensure that the cuts fall between the marked lines. This precision will separate the wood fibers cleanly, resulting in well-formed notches.
Building Process

Crafting a sturdy off-grid structure begins with the meticulous preparation of logs. The Gransfors Bruk model 1900 Swedish ax is invaluable for peeling and notching, ensuring each log is ready for fitting. Log aesthetics significantly impact the visual appeal of your structure, so each log should be peeled to a smooth surface. This process takes about 30 minutes per thinner log, a task that, while time-consuming, is crucial for the building's integrity.
Maintaining accuracy in creating notches and grooves is a notable challenge. Scribing, which involves marking the "belly groove" and notch lines, requires precise measurements. Ensure your gap width is at least 8 cm for a proper fit. Using log dogs during cutting prevents log rotation, maintaining precision and stability.
The construction process is slow but rewarding. Raising each log before building your log walls helps prevent bug infestation. This attention to detail not only enhances the durability of your build but also makes the construction process a gratifying experience.
Viewer Engagement
Regularly updating your audience on your off-grid building process is crucial for fostering a sense of community and encouraging subscriber growth. Sharing the step-by-step journey of constructing a temporary small cabin not only sparks interest but also demonstrates practical applications of the building techniques discussed.
Highlighting the meticulous and enjoyable process of building log walls allows viewers to appreciate the craftsmanship involved in off-grid construction.
Encouraging viewer feedback enhances interaction, providing valuable insights into your construction methods and progress. Acknowledge and appreciate comments, creating an open dialogue that strengthens community involvement. When viewers see their feedback influencing the content, they become more invested in the project.
Sharing your experiences with tree growth experiments and material sourcing promotes educational discussions around sustainable building practices. This transparency fosters a learning environment where viewers can exchange tips and ideas, enriching the community further.
Consistent updates on your progress, combined with the active involvement of your audience, create a dynamic and engaging platform. This interaction not only educates but also builds a loyal subscriber base eager to follow every step of your off-grid building adventure.
Conclusion
For your off-grid building project, using a Gransfors Bruk model 1900 Swedish axe can significantly enhance your construction process. Proper tree selection, precise scribing techniques, and the use of log dogs will ensure that your logs fit perfectly. Each notch and groove you create will strengthen the structure and enhance its aesthetic appeal. By adopting these methods, you will achieve both durability and visual beauty in your log wall construction. Happy building!